PHP和Ajax实现文章添加类别功能
本文主要和大家介绍了PHP+Ajax实现的博客文章添加类别功能,结合实例形式分析了php+ajax实现的数据交互、数据库连接、查询等相关操作技巧,需要的朋友可以参考下,希望能帮助到大家。
一. 代码
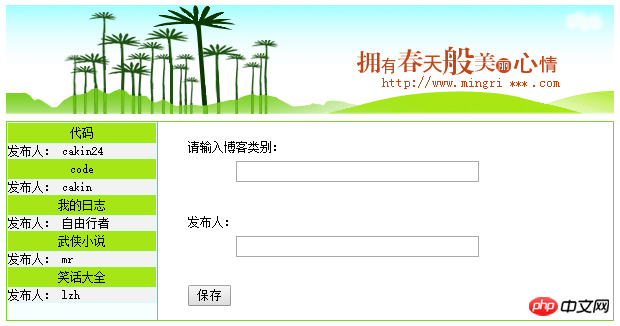
fun.jsfunction saveType(typename, username){if(typename==''){//判断博客类别是否为空alert('请输入类别名称!');}else if(username==''){//判断用户名是否为空alert('请输入用户名!');}else{var xmlObj;//定义XMLHttpRequest对象var urlData = "typename="+typename+"&username="+username;//指定要发送的数据if(window.ActiveXObject){//判断浏览器是否支持ActiveXObject组件,如支持则通过ActiveXObject方式创建XMLHttpRequest对象xmlObj = new ActiveXObject("Microsoft.XMLHTTP");}else if(window.XMLHttpRequest){//如果浏览器不支持ActiveXObject组件,则使用XMLHttpRequest组件创建XMLHttpRequest对象xmlObj = new XMLHttpRequest();}xmlObj.onreadystatechange = callBackFun;//指定回调函数xmlObj.open("POST", "saveType.php", true);//指定提交方法和页面xmlObj.setRequestHeader("Content-Type", "application/x-www-form-urlencoded;");//指定发送数据库类型xmlObj.send(urlData);//指定发送的数据function callBackFun(){//定义回调函数if(xmlObj.readyState == 4 && xmlObj.status == 200){//如果服务器端返回内容并无错误发生if(xmlObj.responseText == 'y'){//判断保存是否成功,并给出提示alert('类别添加成功!');}else{alert('类别添加失败!');}}}}}conn.php<?php$host = '127.0.0.1';$userName = 'root';$password = 'root';$connID = mysql_connect($host, $userName, $password);mysql_select_db('db_database27', $connID);mysql_query('set names gbk');?>index.php<?phprequire_once 'conn.php';?><!DOCTYPE html PUBLIC "-//W3C//DTD XHTML 1.0 Transitional//EN" "http://www.w3.org/TR/xhtml1/DTD/xhtml1-transitional.dtd"><html xmlns="http://www.w3.org/1999/xhtml"><head><meta http-equiv="Content-Type" content="text/html; charset=gb2312" /><title>添加类别</title><link rel="stylesheet" type="text/css" href="css/style.css" rel="external nofollow" rel="external nofollow" /></head><script language="javascript" alt="PHP和Ajax实现文章添加类别功能" src="js/fun.js"></script><body><table border="0" align="center" cellpadding="0" cellspacing="0"> <tr><td><img alt="PHP和Ajax实现文章添加类别功能" src="images/banner.gif" width="608" height="109" /></td> </tr></table><table width="200" height="7" border="0" align="center" cellpadding="0" cellspacing="0"> <tr><td></td> </tr></table><table width="608" height="200" border="0" align="center" cellpadding="0" cellspacing="1" bgcolor="#7ED227"> <tr><td width="150" bgcolor="#F6FEFE" valign="top"><table width="150" border="0" cellpadding="0" cellspacing="1" bordercolor="#FFFFFF" bgcolor="#D6FEFE"><?php$sql = mysql_query("select typename,username from tb_type order by addtime desc", $connID);$result = mysql_fetch_array($sql);if ($result){do{?><tr><td bgcolor="#A6E617" height="20"><p align="center"><a href="#" rel="external nofollow" rel="external nofollow">saveType.php<?phprequire_once 'conn.php';?><!DOCTYPE html PUBLIC "-//W3C//DTD XHTML 1.0 Transitional//EN" "http://www.w3.org/TR/xhtml1/DTD/xhtml1-transitional.dtd"><html xmlns="http://www.w3.org/1999/xhtml"><head><meta http-equiv="Content-Type" content="text/html; charset=gb2312" /><title>添加类别</title><link rel="stylesheet" type="text/css" href="css/style.css" rel="external nofollow" rel="external nofollow" /></head><script language="javascript" alt="PHP和Ajax实现文章添加类别功能" src="js/fun.js"></script><body><table border="0" align="center" cellpadding="0" cellspacing="0"> <tr><td><img alt="PHP和Ajax实现文章添加类别功能" src="images/banner.gif" width="608" height="109" /></td> </tr></table><table width="200" height="7" border="0" align="center" cellpadding="0" cellspacing="0"> <tr><td></td> </tr></table><table width="608" height="200" border="0" align="center" cellpadding="0" cellspacing="1" bgcolor="#7ED227"> <tr><td width="150" bgcolor="#F6FEFE" valign="top"><table width="150" border="0" cellpadding="0" cellspacing="1" bordercolor="#FFFFFF" bgcolor="#D6FEFE"><?php$sql = mysql_query("select typename,username from tb_type order by addtime desc", $connID);$result = mysql_fetch_array($sql);if ($result){do{?><tr><td bgcolor="#A6E617" height="20"><p align="center"><a href="#" rel="external nofollow" rel="external nofollow">二. 运行结果

以上就是PHP和Ajax实现文章添加类别功能的详细内容,更多请关注小潘博客其它相关文章!


